Add Bold Visual Style to Your Portraits with Creative Background Lighting
When you’re shooting indoors, your backdrop can either look dull and boring — or it can become the secret weapon that adds drama, mood, and personality to your images.
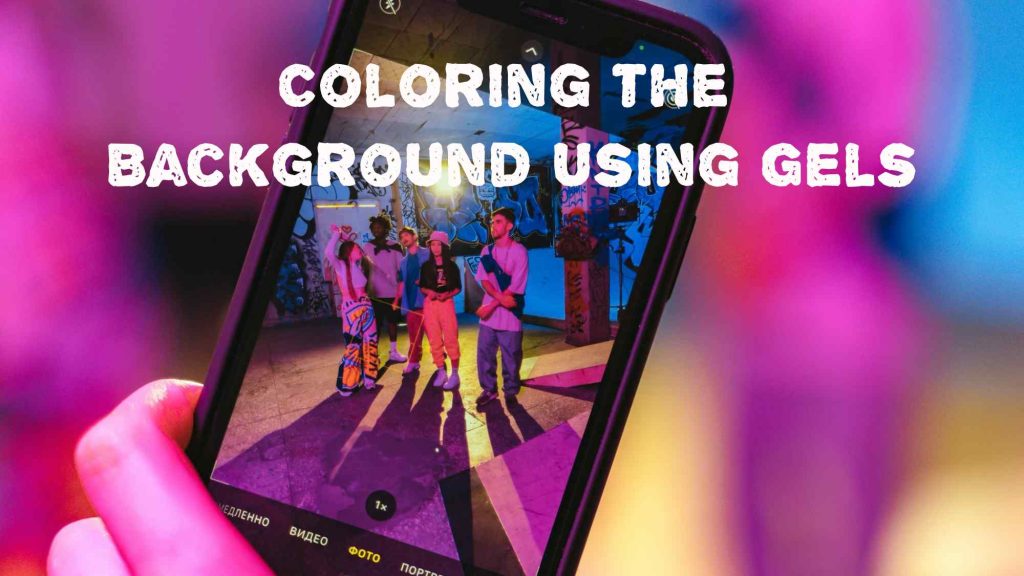
One of the most creative and low-cost ways to transform any plain background is by using gels—transparent colored sheets placed over lights. With just a few gels and basic lighting gear, you can instantly give your indoor portraits a professional, cinematic look.
In this post, we’ll show you how to color your background with gels, why it works, and how to do it in both small spaces and full home studios.
🎨 What Are Lighting Gels?
Lighting gels are thin, colored sheets made of heat-resistant plastic or polyester. They’re placed over a light source to change the color of the light.
Photographers use gels for two main purposes:
- Color correction – matching light temperatures (CTO, CTB, etc.)
- Creative effects – adding color for mood and style (red, blue, purple, green, etc.)
In this guide, we’ll focus on the second use: creative color effects on backgrounds.
🎯 Why Use Gels on Backgrounds?
Coloring your background with gels can:
- Add mood and emotion (warm, cool, energetic, calm)
- Help your subject pop from the backdrop
- Create contrast using complementary colors
- Give your photos a cinematic or editorial vibe
- Turn a boring wall into a styled set
And the best part? You don’t need expensive gear to get started.
🛠️ What You’ll Need
You don’t need a full studio—just a few affordable items:
📸 Basic Gear:
- 1 key light (for your subject)
- 1 background light (strobe, speedlight, or LED)
- Color gels (red, blue, purple, orange, teal, etc.)
- Light stand or tripod
- Plain wall, seamless paper, or cloth as backdrop
- Optional: modifiers like grids, snoots, or barn doors to control light spill
🔧 How to Color Your Background Using Gels (Step-by-Step)
🔹 Step 1: Set Up Your Subject and Key Light
Start with your basic one-light portrait setup:
- Subject about 4–6 feet in front of the background
- Key light at a 45° angle to subject’s face (loop or Rembrandt lighting)
- Ensure your key light does not spill onto the background (use flags or grids if needed)
🔹 Step 2: Position Your Background Light
Place your second light (with gel) on a stand or tripod aimed directly at the background.
- Distance matters: The closer the light, the more intense the color.
- Aim for even coverage unless you’re going for a spotlight or gradient effect.
- For softer transitions, bounce the light off a white card or use a diffuser.
🔹 Step 3: Attach the Gel
Secure the gel using:
- Gel clips or magnets (if using speedlights)
- Gaffer tape (be careful with heat)
- Dedicated gel holders (recommended for continuous lights)
Avoid placing gels directly on hot lights unless they’re heat-resistant.
🎨 Experiment with different colors and intensities. Even the same color will look different based on distance, brightness, and exposure.
🔹 Step 4: Expose and Balance
- Set your background light intensity separately from your key light.
- Check your histogram or back LCD to avoid blowing out colors.
- You can make the background more subtle by underexposing the gel light by 1–2 stops.
🎬 Creative Color Combos to Try
Looking for inspiration? Try these tried-and-tested combinations:
| Key Light | Background Gel | Effect |
|---|---|---|
| Neutral white | Blue | Calm, cool, modern |
| Warm (orange/CTO) | Teal | Cinematic contrast |
| Soft white | Purple | Elegant and editorial |
| Daylight | Red | Bold, passionate, intense |
| Warm | Pink or Magenta | Soft, romantic vibes |
💡 Use a color wheel to find complementary or split-complementary color combos for better visual harmony.
🧪 Experiment: One Background, Four Colors
Try this quick test:
- Use a white wall or backdrop
- Shoot the same portrait using four different gels: red, blue, purple, and orange
- Keep all settings the same
You’ll see how the same subject and lighting setup creates wildly different moods just by changing the background color.
⚠️ Common Mistakes to Avoid
- Light spill on the subject: Use flags, snoots, or distance to prevent your background color from coloring your subject.
- Too much saturation: Dial it back by lowering the background light’s power.
- Gels melting: Never attach cheap gels directly to hot lights—use safe distances or heatproof gels.
- Overexposing the background: Too much brightness can make colors look blown out or unnatural.
🧠 Pro Tips for Stunning Gel Backgrounds
- Use two background lights with different gels for split-tone effects
- Try backlighting smoke or haze with a colored gel for a dreamy glow
- Combine a textured wall with a colored gel to highlight depth
- Add a hair light or rim light to keep your subject separated from the background
🎯 Final Thoughts: Make Backgrounds Part of Your Story
In photography, the background isn’t just a backdrop—it’s part of the story. With gels, you can inject creativity, color, and emotion into every frame.
🎨 Start small. One gel. One light. One wall. Then let your creativity take over.
Whether you’re creating moody blue headshots, fiery red fashion portraits, or playful pink lifestyle photos, coloring your background with gels is one of the easiest ways to transform your indoor photography.
🔔 Stay Inspired with Photoclick
Want more lighting tricks, DIY setups, and creative photography guides?
Follow Photoclick for weekly inspiration—designed for creators who shoot smart, not expensive.
Highly engaging