Master Lighting with Just One Light – Even in Your Living Room
Getting started with indoor photography doesn’t require a full studio or expensive lighting gear. In fact, you can create professional-looking portraits with just one light—yes, one!
Whether you’re working in a home studio, a bedroom, or a corner of your living room, this guide will show you how to build your first indoor one-light setup from scratch.
📸 Why Start with One Light?
Starting with one light forces you to:
- Understand how light behaves
- Learn to control shadows
- Focus on composition and mood, not complexity
Most iconic portraits in photography history were shot using just one source of light—often a window, lamp, or basic strobe.
Let’s walk through a simple setup you can do at home.
💡 What You Need for a Basic One-Light Setup
You don’t need a full studio. Just grab these essentials (or budget alternatives):
✅ Your Basic Kit:
- Camera (any DSLR, mirrorless, or even a phone with manual control)
- Light source (off-camera flash, strobe, or continuous LED)
- Light modifier (softbox, umbrella, or even a white bedsheet)
- Tripod or light stand
- Backdrop (plain wall, curtain, or paper background)
💡 Budget Tip: A desk lamp with a daylight bulb and a white T-shirt as a diffuser can work wonders!
🧭 Step-by-Step: Your First One-Light Setup
🔹 Step 1: Choose the Right Room
Pick a small-to-medium room with minimal ambient light you can control (especially for artificial lighting). Avoid rooms with strong mixed light (like fluorescent + sunlight), which can confuse your camera’s white balance.
🔹 Step 2: Position Your Subject
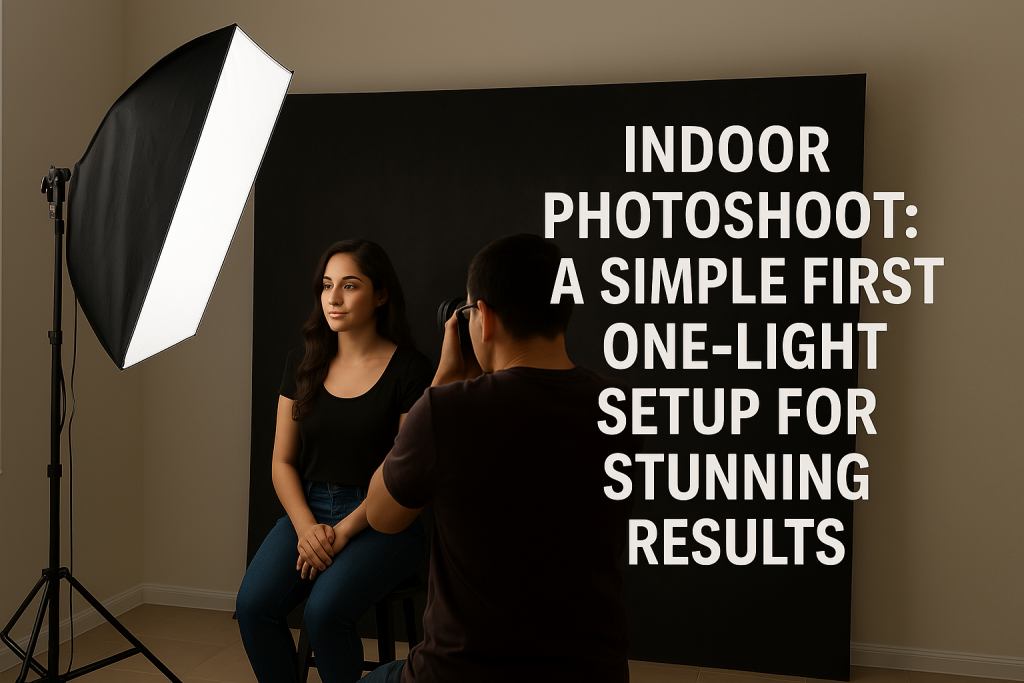
Place your subject at least 3 feet away from the background. This adds separation and reduces harsh shadows behind them.
Face them slightly off-camera—not straight on—for a more natural and dynamic portrait.
🔹 Step 3: Place the Light at a 45-Degree Angle
Set your light at about 45 degrees to the front side of your subject, and raise it slightly above eye level, angling it downward.
This creates Rembrandt lighting—a classic look where one side of the face is lit and the other has a triangle of light under the eye.
🎯 Why this works: It adds depth, shape, and drama to the face while maintaining softness.
🔹 Step 4: Soften the Light
Use a softbox, umbrella, or DIY diffuser (like tracing paper or a white cloth) to soften shadows and create flattering skin tones.
Hard light = sharp shadows and highlights
Soft light = gentle falloff and smoother skin
💡 The larger the light source relative to your subject, the softer the light.
🔹 Step 5: Adjust Background and Fill (Optional)
If your background is too dark or flat, try:
- Adding a reflector (white foam board or reflector disk) on the opposite side to bounce some light
- Using practical lights (like lamps or fairy lights) in the background for interest
But keep it simple. One light = the star of the show.
🔹 Step 6: Camera Settings (Manual Mode Recommended)
Here’s a basic starting point:
- Shutter Speed: 1/125s (safe for handheld shots with flash or continuous light)
- Aperture: f/2.8 to f/5.6 (depending on desired depth of field)
- ISO: As low as possible for clean images (try ISO 100–400)
- White Balance: Match your light source (Daylight, Tungsten, or custom Kelvin)
Take a few test shots and adjust depending on your camera and light output.
🧪 Bonus Tip: Use a Window as Your First “One Light”
If you don’t have an external light yet, use a window!
- North-facing windows give soft, consistent light.
- Use sheer curtains to diffuse.
- Hang a dark cloth opposite the window to increase contrast.
- Perfect for natural-light indoor portraits.
🖼️ Sample Lighting Styles You Can Try with One Light
| Lighting Style | Light Placement | Mood/Effect |
|---|---|---|
| Rembrandt | 45° front-side, slightly elevated | Classic, dramatic, 3D facial shape |
| Butterfly (Paramount) | Directly in front, high above face | Glamour, flattery, beauty shots |
| Split Lighting | Directly from the side | Bold, moody, intense look |
| Loop Lighting | 30–45° front-side | Balanced, flattering portrait |
Try them all—you’ll start recognizing these patterns in professional photography instantly.
🎯 The One-Light Mindset: Less Gear, More Creativity
When you shoot with a single light, every shadow becomes intentional, every highlight strategic. You learn the foundational skill all great photographers and cinematographers master: lighting control.
📌 Remember: You don’t need more lights. You need to do more with one.
🧠 Final Thoughts: Your Studio Is Wherever You Make It
You don’t need a warehouse or budget-breaking gear to create beautiful indoor portraits. All you need is:
- A single light
- A creative eye
- The patience to play and adjust
Start small. Learn how to shape light, not just add it. You’ll build the confidence to expand to two or three lights later—but your one-light skills will always be the foundation.