Elevate Your Portraits with Perfect Light Wrap and Catchlights
If you’re aiming for that flawless, glowing beauty portrait, the secret might not lie in an expensive camera or exotic lens—but in your lighting modifiers. Specifically, the tri-flector.
Used in fashion, beauty, and commercial photography, a tri-flector creates a soft, wrap-around light that eliminates shadows under the chin, nose, and eyes, delivering a luminous and professional look.
In this blog, you’ll learn:
- What a tri-flector is and how it works
- How to use it in a small indoor studio
- Setup tips for perfect catchlights
- Real examples for portraits and beauty shots
Let’s dive into one of the most flattering indoor lighting techniques for faces.
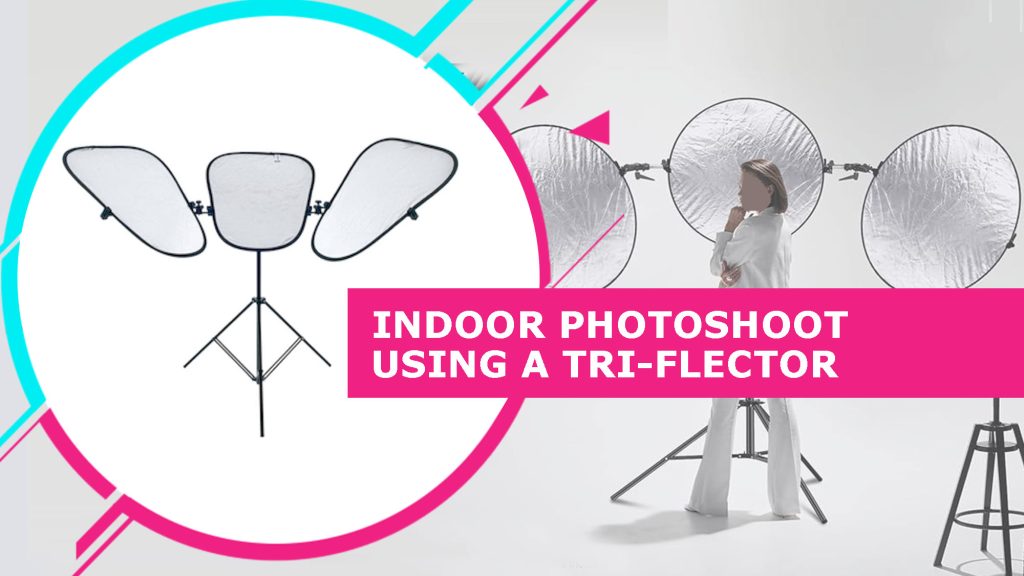
💡 What Is a Tri-flector?
A tri-flector is a three-panel reflector setup designed to bounce light back onto your subject’s face from below and both sides.
It’s most commonly used in beauty photography, where soft, even, upward lighting is essential to enhance facial features while minimizing imperfections.
🔹 Key Characteristics:
- Reflects light back to the chin, neck, and cheeks
- Creates triangular or curved catchlights in the eyes
- Softens jawlines and lifts shadows
- Requires just one main light to work effectively
🎯 Why Use a Tri-flector?
| Benefit | Result |
|---|---|
| Removes under-chin shadows | Cleaner jawline in portraits |
| Brightens under-eyes | Youthful, well-rested look |
| Enhances catchlights | Beautiful sparkle in the eyes |
| Gives face a “lit from below” glow | High-end magazine-style finish |
Used correctly, a tri-flector gives the “glamour glow” associated with high-end beauty shoots and skincare ads.
🛠️ Gear You’ll Need
- A main light (softbox or beauty dish recommended)
- A tri-flector kit (or 3 reflectors rigged at angles)
- Light stand or boom arm for the main light
- Chair or stool for the subject
- Optional: Background light or hair light
🧠 Pro Tip: Don’t have a tri-flector? You can DIY one using three silver or white reflectors and clamps on stands.
⚙️ Step-by-Step Setup: Beauty Lighting with a Tri-flector
1. Position the Main Light
- Place your key light directly in front and above the subject, angled down about 45°.
- Ideal modifiers: Beauty dish with diffuser, or a softbox.
- Height: Slightly above eye level, angled toward the nose tip.
2. Place the Tri-flector
- The tri-flector sits just below the subject’s face, curving around the chin and cheeks.
- Each panel reflects light from a different angle, wrapping it around the face.
- Adjust each panel to eliminate harsh shadows under the chin and sides of the face.
🎯 Goal: Soft, even illumination from below, filling in every shadow naturally.
3. Adjust Exposure and Angles
- Watch for catchlights in the eyes. A well-placed tri-flector often creates three distinct light reflections, giving a polished, engaging look.
- Adjust power on the main light for proper skin tone and exposure.
🧪 Check with a histogram to avoid blowing out highlights on skin, especially on lighter complexions.
4. Optional: Add Hair or Background Light
- Add a rim or hair light from behind to give separation from the background.
- A subtle background light adds depth and keeps the white background from turning grey.
📸 Example Lighting Diagram
lessCopyEdit    [ Hair Light ]
         |
    [ Key Light ]
         ↓
      [Camera]
         ▲
    [Tri-flector]
- Key light above, angled 45°
- Tri-flector positioned below and slightly curved around face
- Subject centered, camera just in front of tri-flector
🎨 Styling and Camera Settings
- Use a neutral or white background for clean beauty looks
- Ask subject to wear minimal makeup or go for a glamorous makeup look depending on brand/style
- Camera settings: f/8–f/11 for sharpness, ISO 100, 1/125 sec
Use a longer focal length (85mm–135mm) to compress features beautifully.
❌ Common Mistakes to Avoid
| Mistake | Why it Happens | Solution |
|---|---|---|
| Catchlights too low | Light too high or reflectors not angled correctly | Lower key light and tilt reflectors upward |
| Chin area too bright | Reflectors too close or key too powerful | Back off reflectors slightly or reduce flash output |
| Uneven fill | Reflector panels not symmetrical | Adjust side panels to match distance and angle |
| Harsh shadows on nose | Key light not centered | Reposition to center and slightly above subject |
🧠 Final Thoughts: Sculpt with Light, Not Just Shadow
The tri-flector isn’t just about softening shadows—it’s about sculpting the face with luminous light. It gives your subject that editorial-level glow without a complicated setup.
From high-end beauty campaigns to client portraits at home, this tool adds a professional finish that’s hard to beat.
🎙️ “In beauty photography, light doesn’t just flatter—it defines.”